

Rasp Pi Zero Badge from Andrew Digitwell on Vimeo.
I am a bit of a gadget man and I recently I saw a project to create a name badge on Instructables based on a Raspberry Pi Zero and I could not resist.
It’s releatively simple to make, but you do need to be a semi-competant solderer.
Components:
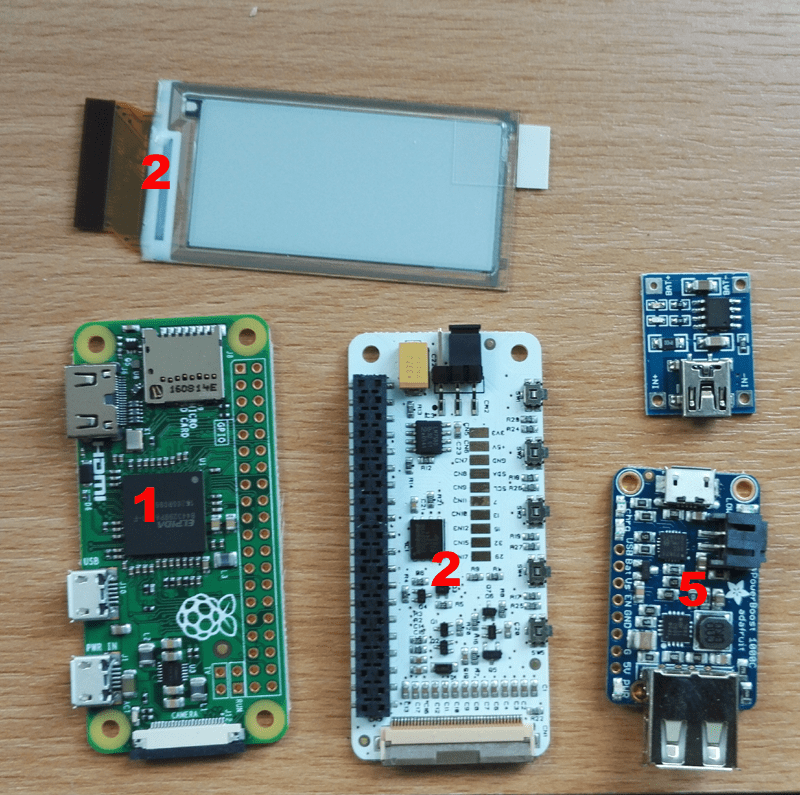
- Raspberry Pi Zero or Raspberry Pi Zero W with GPIO headers
- PaPirus 2″ e-ink Hat
- 3.7v 1200maH LiPo Battery
- Slider Switch
- 3.5 – 5V PowerBoost with Charger
- 8GB Micro SD card
All of these components are available from a variety of sources so I’m not going to recommend any particular one.
Construction:
Hardware
The Pi is supplied without the GPIO header attached, blue box on diagram below, so soldering this on is the first and most time consuming job.
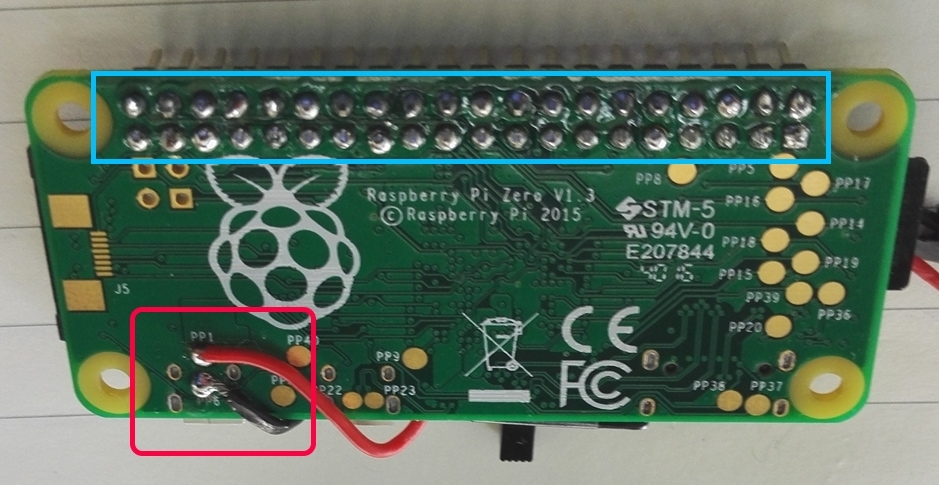
Then solder the two wires on to the back of the Pi underneath the Micro USB power slot, red box on diagram these will be connected to the switch and then to the Charger/Powerboost.
The E-Ink display also needs some minimal construction which is to insert the flexible data cable into the header on the circuit board and then stick down the display with a bit of double sided tape.
During initial testing, I fried the Power Boost charger by plugging the battery in the wrong way round. so be careful here!
That’s it you are all ready for the software.
Software
There are plenty of guides to install Raspian on a Pi. See this link https://www.raspberrypi.org/documentation/installation/
Once you are up and running, make sure that the Pi is fully up to date (sudo apt-get -y update && sudo apt-get -y upgrade),
Update the configuration of the Pi to turn on the SPI and I2C interfacing options, this is done through the Rapberry Pi Configuration program which is inthe main menu, under preferences. If you didn’t install or start a graphic display, it can also be found as “raspi-config” from the command line.
Now you need to download the software for the e-ink screen. You can get it from here: https://github.com/PiSupply/PaPiRus
or just runs the following commands:
curl -sSL https://goo.gl/i1Imel | sudo bash
papyrus-set 2.0
assuming you have the 2 inch panel. If all went well, you can test it with the command
papyrus-gol
to run a version of Game of Life on the display. The github page shows the full range of possible commands.
To get the badge running, you need to create a python script and run it at startup using cron.
The files I used are held on GitHub https://github.com/Digitwellsolutions/einkBadge.git
That’s it.
If you’d like any more info. Feel free to contact me using the form or on 07976 913456.